
Making a small wicking bed
Time Allocation: 30-40 minutes*
Activity Level: Moderate
Introduction
Making a small wicking bed out of a polystyrene box is a great way to upcycle materials to produce a functional planter-box, providing participants with a great sense of satisfaction. This activity does involve a few key steps, and requires adult supervision to ensure that the sequence is successfully followed. The water saving features of wicking make this small garden bed ideal for food plants such as herbs, vegetables and berry plants.
The small wicking bed is a great team-building activity, and more than one bed can be produced by older students working in small groups. This activity involves many roles to maximise student-participation and introduces scientific ideas that can be further investigated. When completed, the wicking bed may be deceptively heavy (a standard polystyrene box filled with soil could weigh around 20kg)and awkward to move, so it is best to build the bed in its final location.
*The time allocation includes preparation details included in the Educator Notes. Sourcing and preparing the materials prior to commencing the activity is essential to successful completion of this activity within the allotted time.
Checklist
Instructions
 STEP 1
Plan
Go through your checklist to ensure you have all the materials you need.
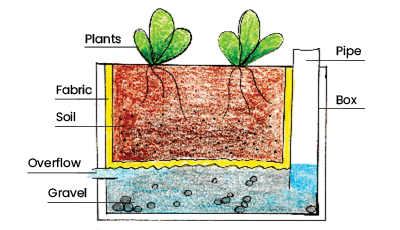
Introduce the activity sheet and demonstrate the cross-section so the students understand this means a vertical slice through the wicking bed box. Explain that the children will be illustrating each part of the wicking bed as it is built on the activity sheet.
Run through the plan with the children and outline the safety steps involved.
A small wicking bed can be used all year round, but plant selection is a key to success.
Plant and seed labels are your friend. They will guide you on how, where and how far apart to plant your seedlings. You can use a measuring tape, a stick, or hand widths to help guide you.
Refer to a planting guide like the Gardenate app to help plan what you intend to grow and when. Are you planting something that people like to eat?
Space out the polystyrene boxes onto your site and discuss where they may go.
Consider how much space your plant needs when it is fully grown. Will it shade other plants?
 STEP 2
Build (Part 1)
Follow the steps in Costa’s video to make and plant-out your wicking bed. Ensure that all of your materials are available and ready.
Cut 40mm PVC pipe to the appropriate length. Cut it to fit the depth of your box plus a length of at least 3cm above. This is so that it rises above the height of the box and can be used to deliver water to your bed.
Add the pipe vertically into a corner. The pipe delivers the water to the gravel reservoir.
Leave some pipe sticking out above the height of the box. This pipe is like a snorkel, it allows air to go in all the time but you can use it to top up the water reservoir so the water is always in there.
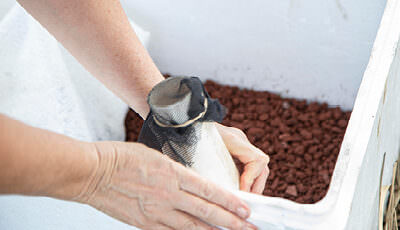
Add gravel to a depth of 5cm. The gravel is used to fill the gaps around the pipe so that the soil layer can sit nice and evenly on the top of the pipe and get wet. You will need to use scoria, less than 7mm or ¼ minus gravel for effective capillary action.
 STEP 3
Build (Part 2)
Pierce a hole in the smallest side of the box using a screwdriver just above the top of the gravel layer. This is the overflow. Poke a short length of garden hose through the hole, to create the overflow pipe.
Add the fabric. This is a layer that separates the soil from the water but it is porous, so when it is wet, it will allow the water to wick or move through and then wet the soil.
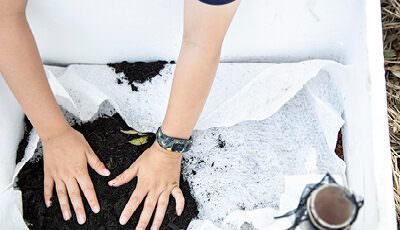
Dampen down any potting mix/soil to minimise risk of airborne microorganisms.
Add the soil. The soil is where we grow the plants. Now it’s time to put the soil in just like filling a pot. Ensure the soil doesn’t fall in underneath the fabric.
Now you plant your wicking bed with your selected seeds or plants.
 STEP 4
Monitor and care
Check to see that the soil is wicking and keep the water topped up, especially as the plants get established.
You will know when to stop filling when water comes out the overflow pipe.
Cap your pipe with the PVC capping or flymesh tied on with a rubber band, this will help reduce evaporation and the breeding of mosquitoes.
Like with all gardens, you will need to replenish the water in hotter, drier and windier weather – just a lot less often.
Extension Activity
Now that you have created your wicking bed, how could you monitor how much water your wicking bed needs? Could you create a research process that measures how much water is needed per day? Or could you measure the mass of the wicking bed at the beginning of each day to find out how much water use has occurred?
Research ‘capillary action’ experiments and conduct your own capillary action trial. Can you explain how water can move upwards against gravity?