
Making a large wicking bed
Time Allocation: 30-40 minutes* (this will be dependent on site selection and travel time)
Activity Level: Moderate
Introduction
Wicking beds use a water reservoir and the capillary action of soil to supply water to plants from below, and can be built from a variety of different materials. The bed featured in our learning activity is made out of a halved IBC tank, but they can be made out of an old bath, halved barrel, upside-down fridge or some other vessel. Constructing the wicking bed explores a range of sustainability concepts including water use, land use, reusing materials and technology in food production.
Making a large wicking bed is a great way to save water and grow a productive vegetable garden, and can often be found in kitchen gardens, household vegetable patches and learning centres. This activity does involve a few key steps, and requires adult supervision to ensure that the sequence is successfully followed.
*The time allocation for this activity refers to the building of a wicking bed, with all materials prepared and ready to be installed. Preparation details are included in the Educator Notes. Sourcing and preparing the materials prior to commencing the activity is essential to successful completion of this activity within the allotted time. You will need extra time again for planting.
Checklist
Instructions
 Step 1
Plan
Go through your checklist to ensure you have all the materials you need.
Finding an appropriate vessel for a reservoir is important. It needs to be watertight, or have the ability to be made watertight.
It also needs to be deep enough, but not too deep. Ideally, your reservoir should be about 150 – 200 mm deep, and then have a soil layer on top no more than 300mm deep. This is because soil only can wick effectively for around 300mm.
Refer to a planting guide like the Gardenate app to help plan what you intend to grow and when.
 Step 2
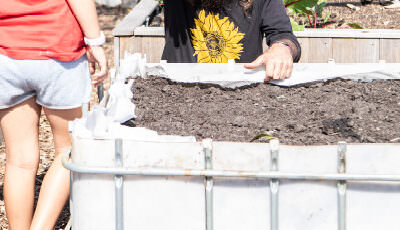
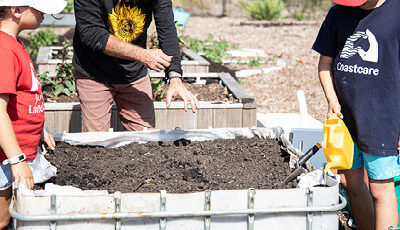
Build
Run through the building plan with the children and outline the safety steps involved. Ensure that all of your materials are available and ready.
Ensure that the site is ready and everything is in the correct, level position. You will not be able to move the wicking bed later because it will be too heavy.
Introduce the activity sheet and discuss how you will investigate the capacity of the wicking bed as it is built.
Follow the steps in the video and educator notes to build your wicking bed.
Fill up the reservoir and use the activity sheet to discuss the capacity of the bed.
 Step 3
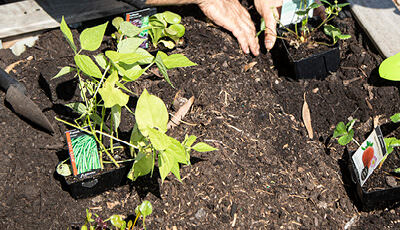
Planting
Now you are ready to plant your wicking bed with your selected plants.
Discuss the plants that you have selected, explain why the wicking bed is being used to grow this crop and the advantages of growing your crop in this type of bed.
Plant labels are your friend. They will guide you on how, where and how far apart to plant your seedlings. You can use a measuring tape, a stick, or hand widths to help guide you.
Water your plants in after you plant them. You will need to water them directly for the first week or two. After this time, the wicking action will supply them with the moisture they need.
Mulch your planting with a good quality light mulch, such as lucerne or pea straw.
 Step 4
Monitor and care
Check to see that the soil is wicking and keep the water topped up, especially as the plants get established.
You will know when to stop filling when water comes out the overflow pipe.
Cap the filling pipe with PVC capping or fly-mesh tied on with a rubber band, this will help reduce evaporation and the breeding of mosquitoes.
Like with all gardens, you will need to replenish the water in hotter, drier and windier weather – just a lot less often.
Extension Activity
Plant comparison – investigate just how much better the wicking bed is by also planting some of the plants in the ground nearby. What do we observe? How do their water requirements differ? Record your observations.
Water level diary: Using a ruler or dowel as a dip-stick, monitor the water level via the filling tube. Record this information in a diary, noting the water level, weather conditions and recent rainfall.